
How-to enable Multi Factor Authentication for Linux using Google Authenticator (part 2)
More than once a month, I get asked if there is a way to implement Multi Factor Authentication on cloud based Linux VM’s without having to buy tokens and implement proprietary services.
There are a couple of Open Source MFA solutions available and for the ease of installation and use I choose to use Google Authenticator.
In part 1 of this tutorial we installed google authenticator on a Redhat/Centos based or Debian/Ubuntu based linux VM. In this second part of the tutorial we are going to link your softtoken to the authenticator service on the linux vm. As a optional bonus I will show how you can prevent having 1 softtoken per VM for every installation in your Cloud environment.
STEP 3: Create the Google Authenticator connection for your account.
You can activate the google-authenticator for the root user or any other user. Switch to the user who should use the two-factor authentication and type in:
google-authenticator
You will be prompted to answer a few questions; answer the first two questions with yes (y):
Do you want authentication tokens to be time-based (y/n) y
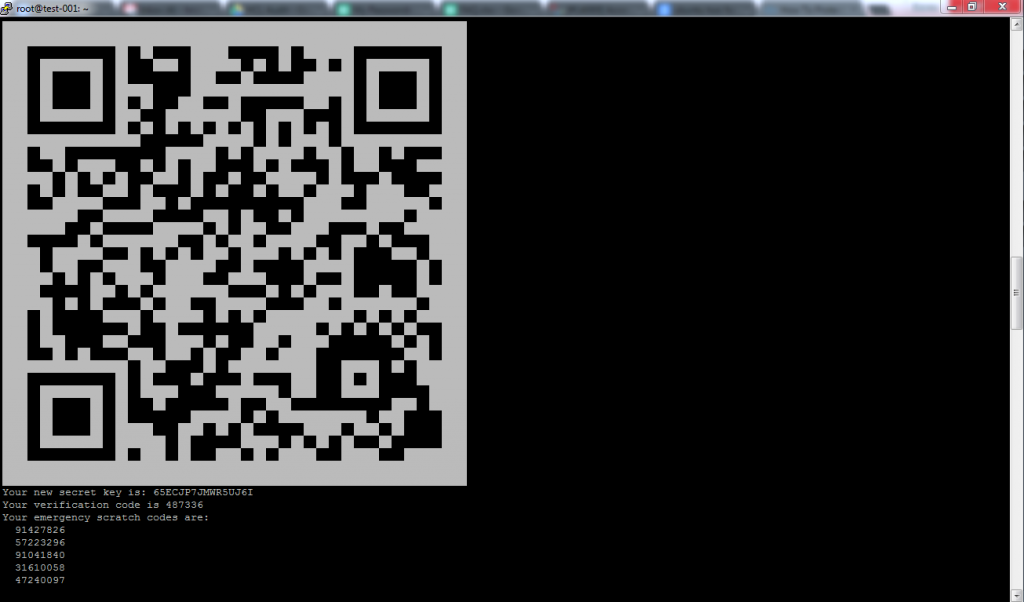
Do you want me to update your "/home/USERNAME/.google_authenticator" file (y/n) y
You can answer the next questions according to your needs.
You can use the Google Authenticator app to scan the qr-code, or add the account using the secret key and the verification code. Do not forget to print out the emergency scratch codes and store them in a safe place!
STEP 4: Create the Google Authenticator connection for your account.
To use the module you have to edit the pam, and sshd config files.
vi /etc/pam.d/sshd
Add the following line on top of the file:
auth required pam_google_authenticator.so
One more file to edit:
vi /etc/ssh/sshd_config
Find and change the following line:
ChallengeResponseAuthentication yes
STEP 5: Restart your SSH service and test the configuration.
Now switch back to root and restart the SSH server. If you added the two-factor authentication for the root user you can skip the next step.
su root
Finally restart the SSH server.
/etc/init.d/ssh restart
That’s it! You should now have a SSH server with an two-factor authentication! Test this by opening up a new ssh session to the server, and verify that you can get in before closing out your current ssh session.
Coming soon
In the last part of this Tutorial, we will show you how to deploy Google Authenticator configuration for your user(s) and how to prevent having to use a differend authenticator for every server you want to access.